Spark connection & management
Architecture overview
Apache Spark is the recommended federation engine used by Lyftron. The are two primary models of working with Spark:
- connecting to an existing standalone cluster (e.g. Azure HDInsight),
- hosting a local instance managed by Lyftron,
The basic key concept here is the Driver which is a small Java application acting as a proxy for delegating incoming requests to the Spark execution engine.
The driver is bundled in a JAR file and then submitted to the cluster using spark-submit.
Once started, the driver starts an in-process Thrift/Http server on the given port and starts listening for incoming connections from Lyftron.
Incoming requests are authenticated using an API-key. Additionally, the driver opens reverse connections to Lyftron via TDS which on the other hand is authenticated using a username/password pair configured on the Spark connection level.
The important thing to note here is that only a few basic parameters (e.g. driver memory) must be passed as spark-submit arguments. Most parameters are configurable on the connection level and will be sent over-the-wire during the first data request.
The driver starts in a "NotInitialized" state which means it doesn't try to connect to Spark until the first request is done.
The actual details differ depending on the connection model used.
Local Spark instance
Introduction
In this model, Spark is started as a child (although independent) JVM process of Lyftron main process. This is achieved via programmatic invoke of spark-submit together with passing the driver JAR file as the primary argument. Other arguments, such as port number are passed as command line arguments as well. At this point, a new Java application is started but Spark itself is not initialized yet. For this to happen the first connection must be established so the Spark parameters can be passed along.
Connecting to Spark
For general information regarding connections see Connections.
Lyftron comes with a single pre-configured local Spark connection.
The important thing to note here is that Spark/Hive configuration is set on different levels. Except for standard environment parameters, a small bit of configuration is stored in config files (see: Advanced configuration) and most on the connection level. At runtime, the configurations are merged in this exact order, which means if a given parameter is defined in a configuration file and then defined again on the connection level, the former one will be used. This behavior is guaranteed.
When adding a new connection the following parameters apply:
| Parameter | Description | Default value |
|---|---|---|
| Name | A human-friendly name of the connection e.g. Local Spark 2.1 | |
| Host:Port | A CSV list of server:port pairs to connect to, see: Cluster failover. For local instance use localhost:port | localhost:8400 |
| Protocol | The protocol that the driver will use to exchange data with Lyftron. Possible values: Thrift, http | Thrift |
| Spark dialect | (= protocol version). The dialect version used to communicate with the driver. Possible values: 1.6, 2.0 | |
| Driver API key | The security key used to authenticate requests incoming from Lyftron. Using the default value is highly NOT recommended. | lyftron-key |
| Username | The account to be used for authenticating reverse connections from the driver | |
| Password | The password for the account above | |
| Default database | The database used for storing data for cached views | |
| Reverse connection host address | The address under which Lyftron can be reached by the driver. For local instance use localhost | |
| Node connection timeout | The timeout used for waiting for each cluster node to respond. See: Cluster failover | 10s |
| Cluster initialization timeout | The timeout given for the instance to initialize when doing the initial request | 30s |
| Batch size | Chunk size used when retrieving query results from Spark | 16777216 bytes |
| Target partition size | See: Partitioning strategy | 128000000 bytes |
| Max partitions for auto repartitioning | See: Partitioning strategy | 256 |
Scheduler pools
To learn about Spark scheduler pools in general, please consult http://spark.apache.org/docs/latest/job-scheduling.html.
In short, scheduler pools describe relative part of cluster's resources that will be assigned to process given task. Lyftron's spark connections support 6 scheduler pools:
- default - scheduler pool used in case no scheduler pool configuration is provided
- ETL - scheduler pool used by cache load tasks, executes job in FIFO order
- S, M, L, XL - 4 pools that user can specify for their queries with ascending allocation of resources
To specify pool to be used for given query follow your query with option clause. For example:
SELECT * FROM Table OPTION(POOL 'XL')]
or
INSERT INTO TABLE(COLUMN) select 1 OPTION(POOL 'S')
Exact configuration values for each scheduler pool can be reviewed and configured on Spark connection screen:

The meaning of the pool properties is a follows:
- Mode: FIFO means tasks are queued one after the other. FAIR means that tasks can run in parallel and share resources.
- Weight: Decides how much of cluster's resources will this pool get relative to other pools.
- Min share: Share of cluster's resources assigned by FAIR scheduler (if possible) before allocation of rest of resources takes place.
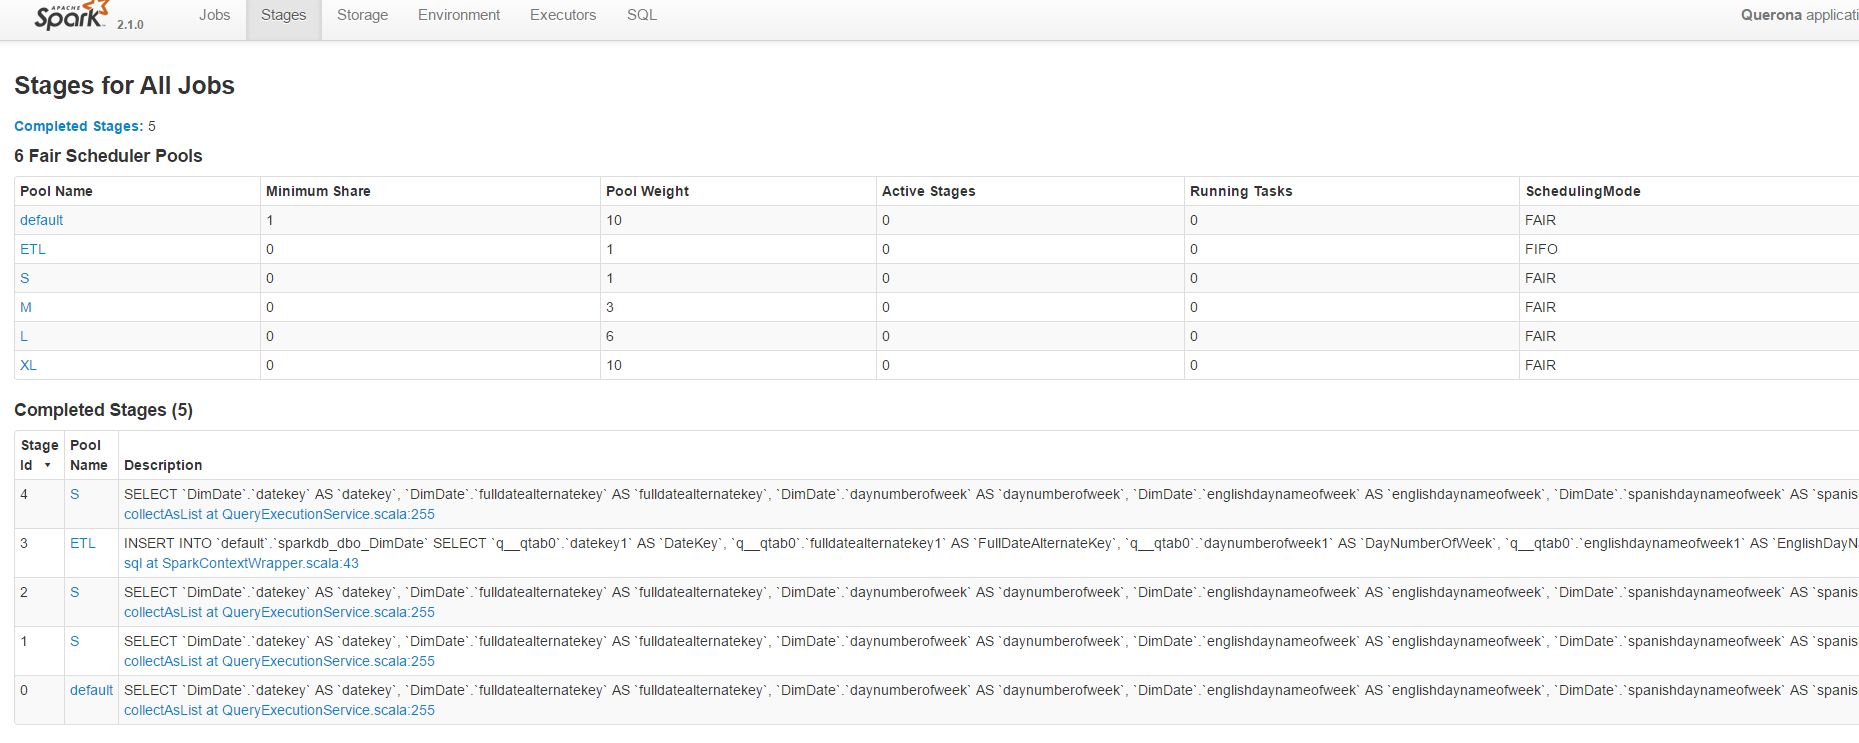
You can review pools used by spark for each query in Spark's admin portal, just go to tab 'Stages':
Spark variables
Any properties prefixed with spark can be defined in this section and will be used when creating a new Spark context. Several of them have been predefined by the Lyftron team with the most noticeable being:
| Parameter | Description | Default value |
|---|---|---|
| spark.ui.port | The Spark UI port. | 4040 |
| spark.local.dir | The local working directory of Spark. | C:\ProgramData\Lyftron\tmp |
Hive configuration
Under the hood, Spark uses Hive as a query execution engine. One of the important properties here is the warehouse directory i.e. a file system folder used as physical data storage.
Depending on version of Spark used, this parameter is set by either/or hive.metastore.warehouse.dir and spark.sql.warehouse.dir. These values are set in the config files (see: Advanced configuration) but can be passed on the connection level as well.
We highly recommend to always consult the documentation of Spark to make sure the right values are set. Excerpt from the Apache Spark v2.2 documentation:
> Note that the hive.metastore.warehouse.dir property in hive-site.xml is deprecated since Spark 2.0.0.
> Instead, use spark.sql.warehouse.dir to specify the default location of the database in a warehouse.
> You may need to grant write privilege to the user who starts the Spark application.
For the local instance the following parameters are also important:
| Parameter | Description | Default value |
|---|---|---|
| javax.jdo.option.ConnectionURL | JDBC connection string to the Hive metastore | jdbc:sqlserver://localhost;databaseName=SparkMetastore;create=true; |
| javax.jdo.option.ConnectionUserName | JDBC login to the Hive metastore | |
| javax.jdo.option.ConnectionPassword | JDBC password to the Hive metastore | |
| hive.exec.scratchdir | C:/ProgramData/Lyftron/tmp/hive | Hive tmp folder |
Connection test and Spark validation
Once configured the Test Connection button can be used to verify whether the instance is responsive. Note, that this only test if the given driver instance responds to incoming connections. To fully test the configuration, the following steps are one of the methods to trigger and check Spark initialization:
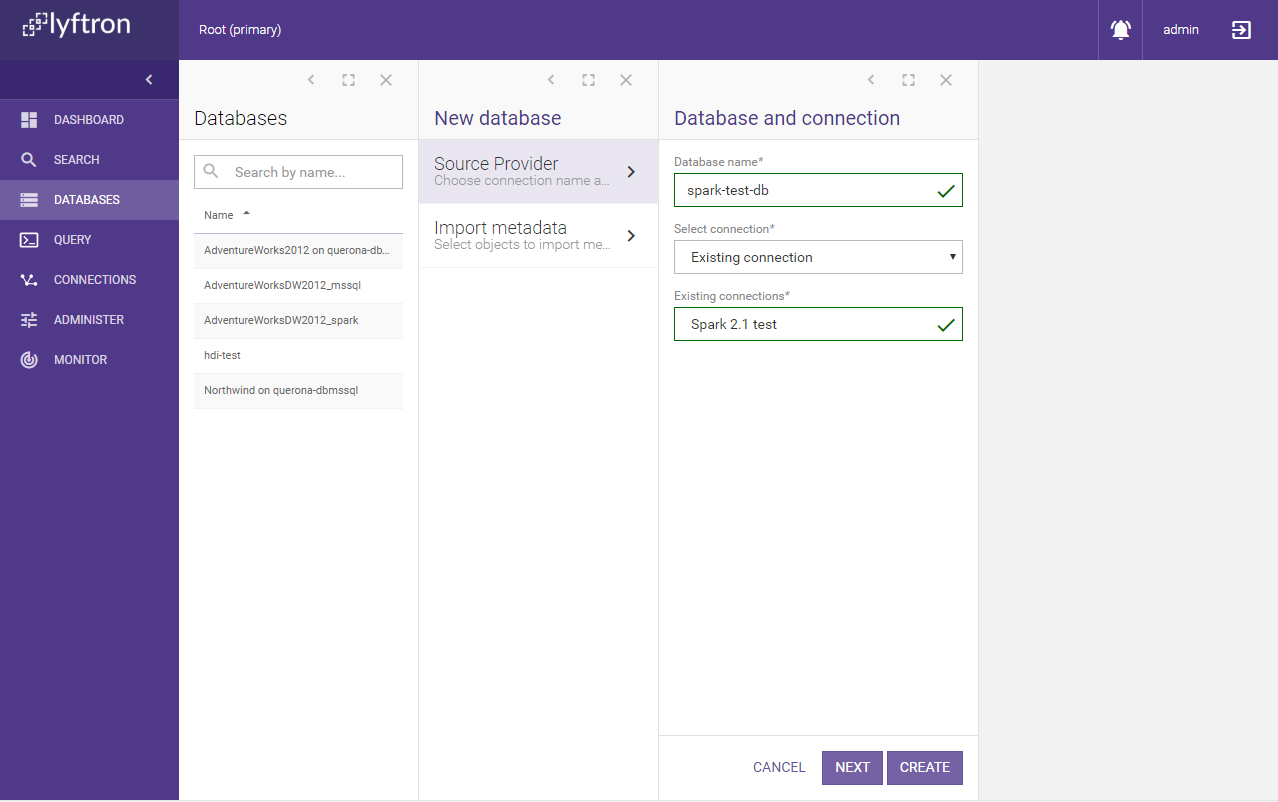
- Using the Lyftron Databases menu create a new database named "spark-test-db" linked to the newly created connection (for more information related to database creation see: Databases)
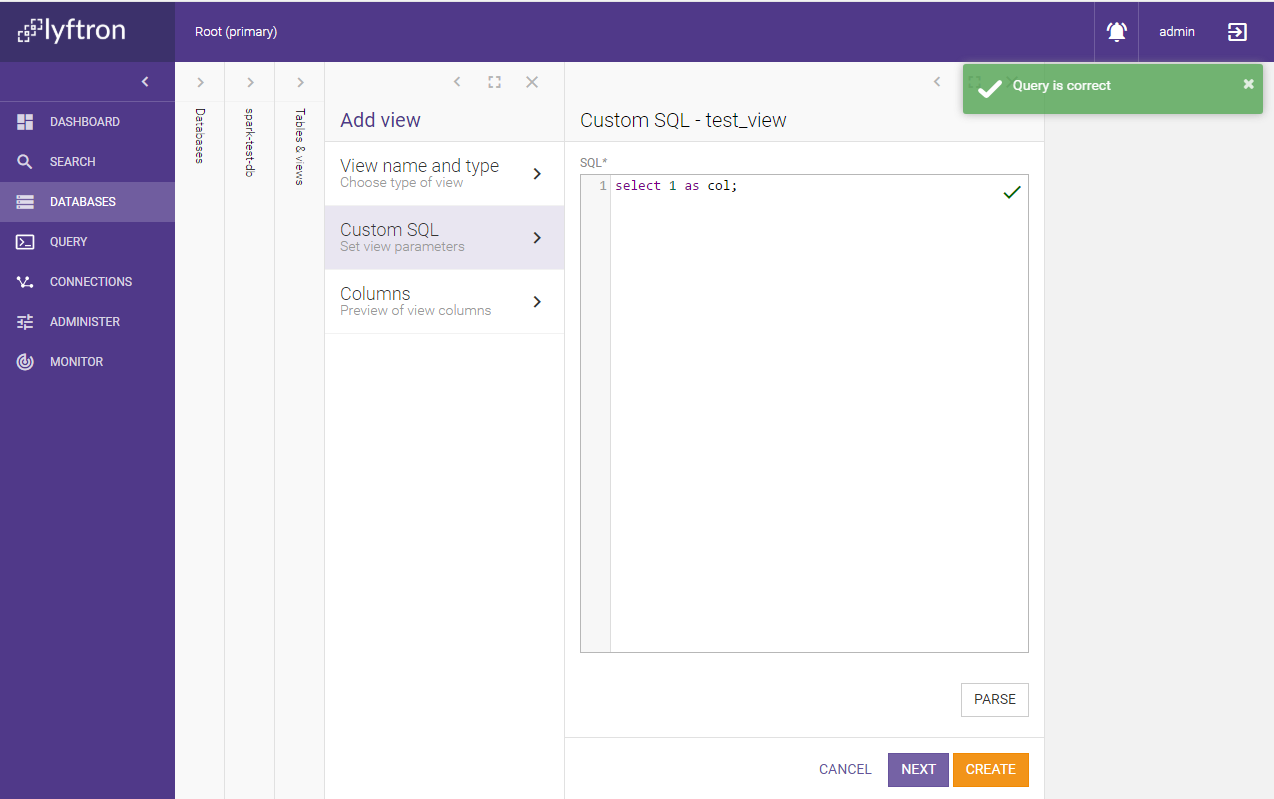
- On the newly created database add new view of type Custom SQL named "test_view":

- On the next screen type
select 1 as col;and click Parse
- Finish creating the view
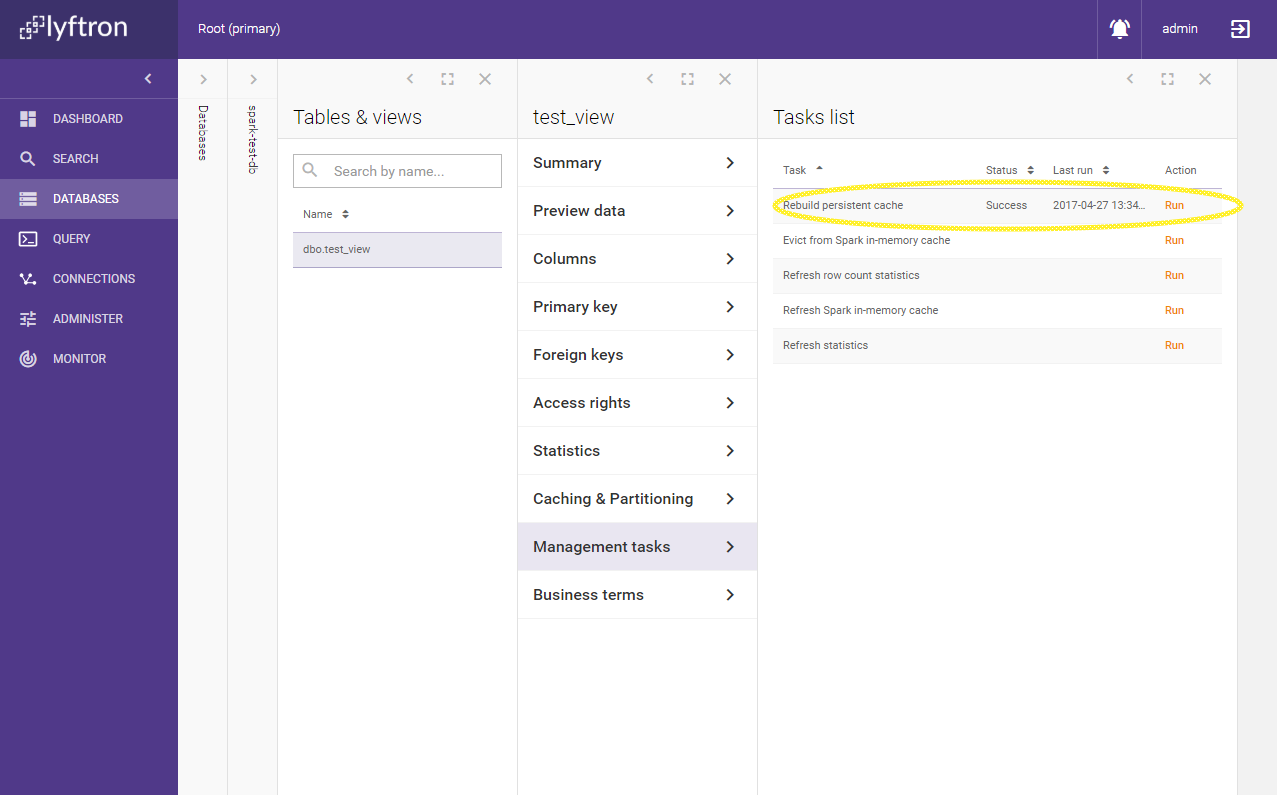
- Click the view on the list and go to Caching and Partitioning, click Edit
- Set Caching mode to Persistent caching - one table and Save

- Go to Management tasks and run Rebuild persistent cache task
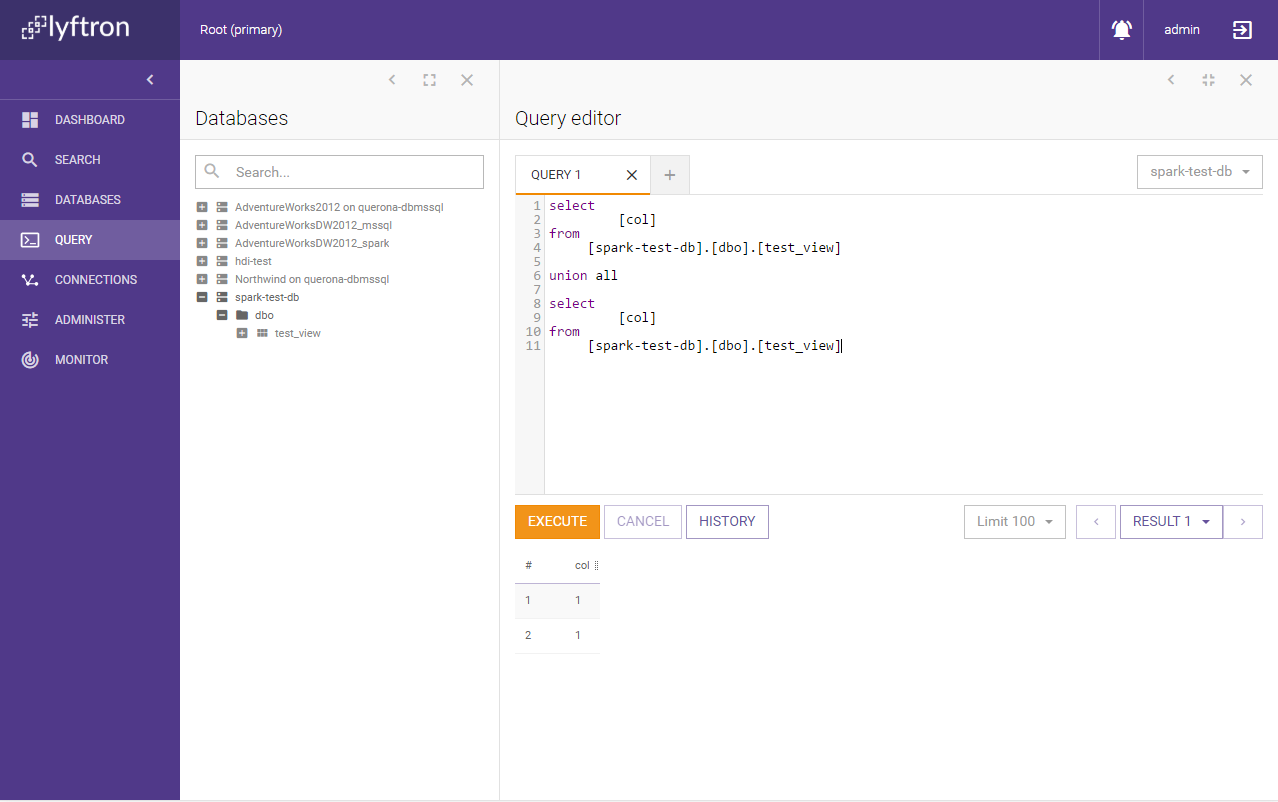
- Go to query editor and run the following query on the Spark database:
select [col]
from [spark-test-db].[dbo].[test_view]
union all
select [col]
from [spark-test-db].[dbo].[test_view]
- The result should look more or less like this:
These actions should force Spark to initialized. To verify it change the URL in the browser from e.g. http://lyftron-example:9000
to http://lyftron-example:4040 where 4040 is the Spark GUI port set in spark.ui.port variable (4040 is the default value).
Spark GUI should open and you should see the query executed:
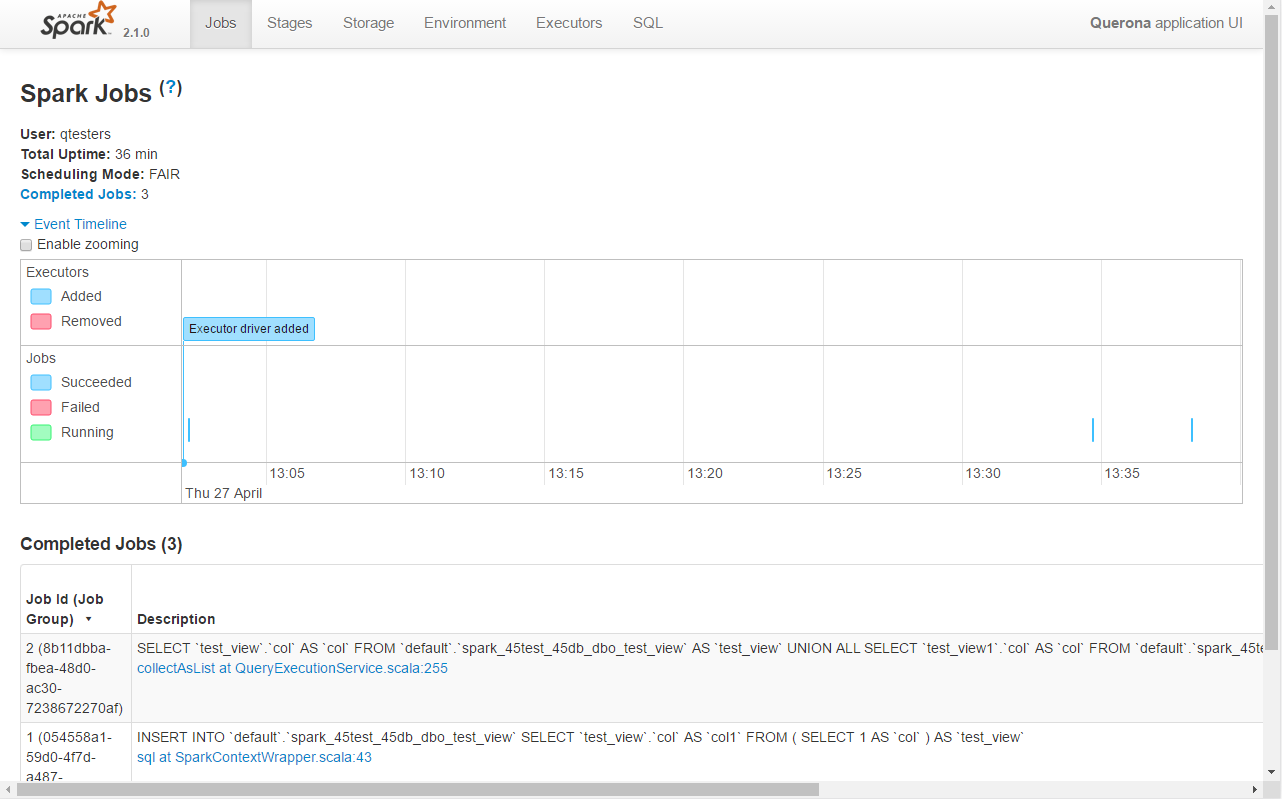
You can click on the tabs to see different jobs and parameters which might be useful for future debugging and optimization.
Partitioning strategy
When JOIN queries are pushed-down to execute on Spark, the data from the original database has to be copied to Spark. Lyftron registers external data sources as JDBC data frames, optionally applying repartition(n) function invocation. If the data frame is too large it has to be broken into smaller chunks. The Target partition size (bytes) parameters defines the target size of these chunks. The default value 128 MiB is recommended as a starting point.
The second parameter Max partitions for auto repartitioning (default: 256) defines the upper limit for the number of partitions to be created.
This means the theoretical limit for a single data transfer, in this case, would be 128 MB * 256 =~ 32 GB which is far more than reasonable for an ad-hoc query. In such cases, it's recommended to create cached-view and bulk load the data.
Local Instance Configuration
Local instance management can be found under the Administer -> Local Spark Instances menu
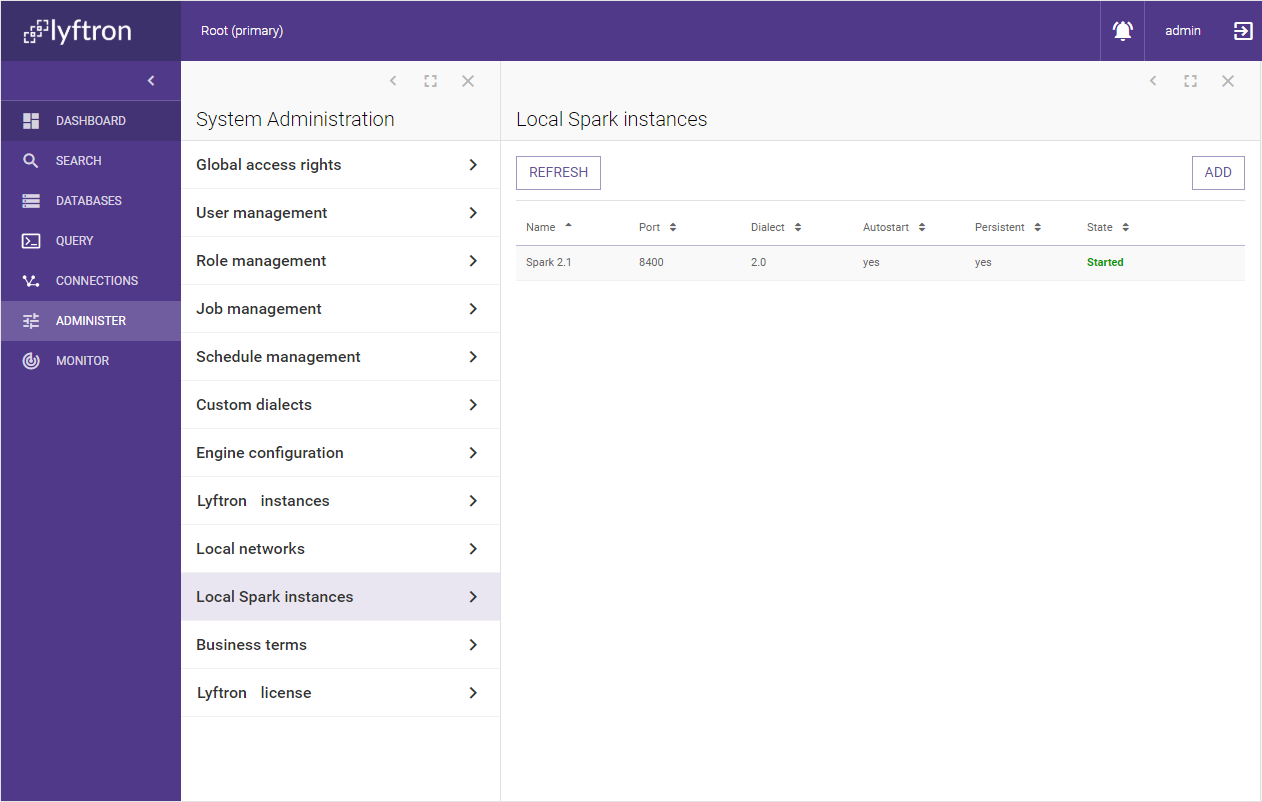
Lyftron is shipped with a single pre-configured instance of Spark.
The Refresh button runs a state check to ensure the State column holds the latest information. The view has not auto-refreshing functionality so it might be necessary to use it a few times during state transition.
The Add button allows configuring a new local instance.
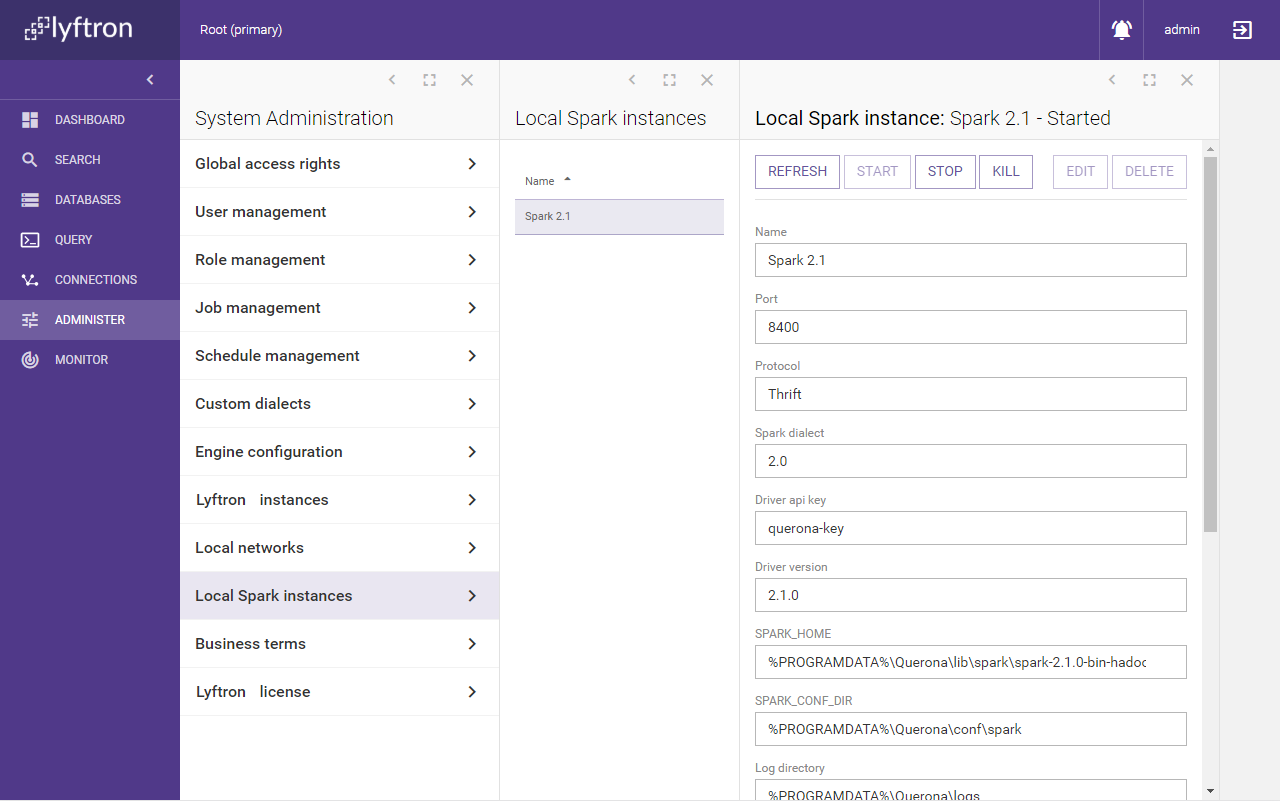
Clicking on a given row brings up the details blade with all parameters shown in read-only mode.
Refresh button works the same way as in the previous screen.
Start, Stop and Kill buttons are used for controlling the instance state.
The difference between Stop and Kill is that the former sends a remote "self-shutdown" command allowing the instance to free all used resources and close itself softly. This process may take up to several minutes. Kill, on the other hand, sends an OS-level kill signal which should terminate the underlying JVM process (not recommended unless necessary).
You can run as many instances as you want at the same time as long as they use different ports.
Parameters
The following values can be configured for a given instance:
| Parameter | Description | Default value |
|---|---|---|
| Name | A human-friendly name of the instance e.g. Spark 2.1 | |
| Port | The port that the driver will open to communicate with Lyftron. | 8400 |
| Protocol | The protocol that the driver will use to exchange data with Lyftron. Possible values: Thrift, http | Thrift |
| Spark dialect | (= protocol version). The dialect version used to communicate with the driver. Possible values: 1.6, 2.0 | |
| Driver API key | The security key used to authenticate incoming requests - this must match the key given when configuring the connection to Spark. Using the default value is highly NOT recommended. | lyftron-key |
| Driver version | The version of the driver to be deployed to the instance - should match the used spark version. | 2.1.0 |
| SPARK_HOME | The root directory of the used Spark distribution. | %PROGRAMDATA%\Lyftron\lib\spark\spark-2.1.0-bin-hadoop2.6 |
| SPARK_CONF_DIR | The directory where Spark configuration is being stored | %PROGRAMDATA%\Lyftron\conf\spark |
| Log directory | The directory where Spark log files are being generated. No spaces allowed. See also: Disable Log Tracing | %PROGRAMDATA%\Lyftron\logs |
| Spark master | Spark master URL | local[*] |
| Driver memory | Amount of memory to use for the driver process, i.e. where SparkContext is initialized. | 8g |
| Executor memory | Amount of memory to use per executor process | 8g |
| Total executor cores | The number of cores to use on each executor | 4 |
| _JAVA_OPTIONS | Value of _JAVA_OPTIONS variable picked up by Spark. Note: setting only "-Xms1G" might trigger the following startup error: "'Initial' is not recognized as an internal or external command" | |
| Autostart | Sets whether the given instance should be started together with Lyftron. | False |
| Persistent | Sets whether the given instance should be left alive even the master Lyftron process is stopped. | False |
| Enable Log Tracing | Checking this flag will cause Lyftron to start tracing and copying Spark log files to Lyftron. It's useful when using a logging engine such as SEQ to have all logs in one place. | False |
Advanced configuration
Additionally Lyftron stores a few configuration files in C:\ProgramData\Lyftron\conf\spark (default).
| File | Description |
|---|---|
| core-site.xml | Lyftron-specific HDFS configuration |
| hive-site.xml | Lyftron-specific Hive configuration |
| lyftron-site.xml | Lyftron configuration parameters |
| spark-env.cmd | Spark environment variables configuration |
Standalone cluster
Introduction
For more resource consuming operations it makes sense to use a preconfigured standalone cluster. Once setup you should configure a new Local instance except for the Spark master parameter should be set to the proper URL e.g. spark://HOST:PORT.
HDInsight
Introduction
If you don't have a running Spark cluster already in place then Microsoft HDInsight might be the solution to quickly get one running.
Lyftron fully supports HDInsight as the data federation engine.
HDInsight configuration
To add a new cluster, you may use the Azure Portal:
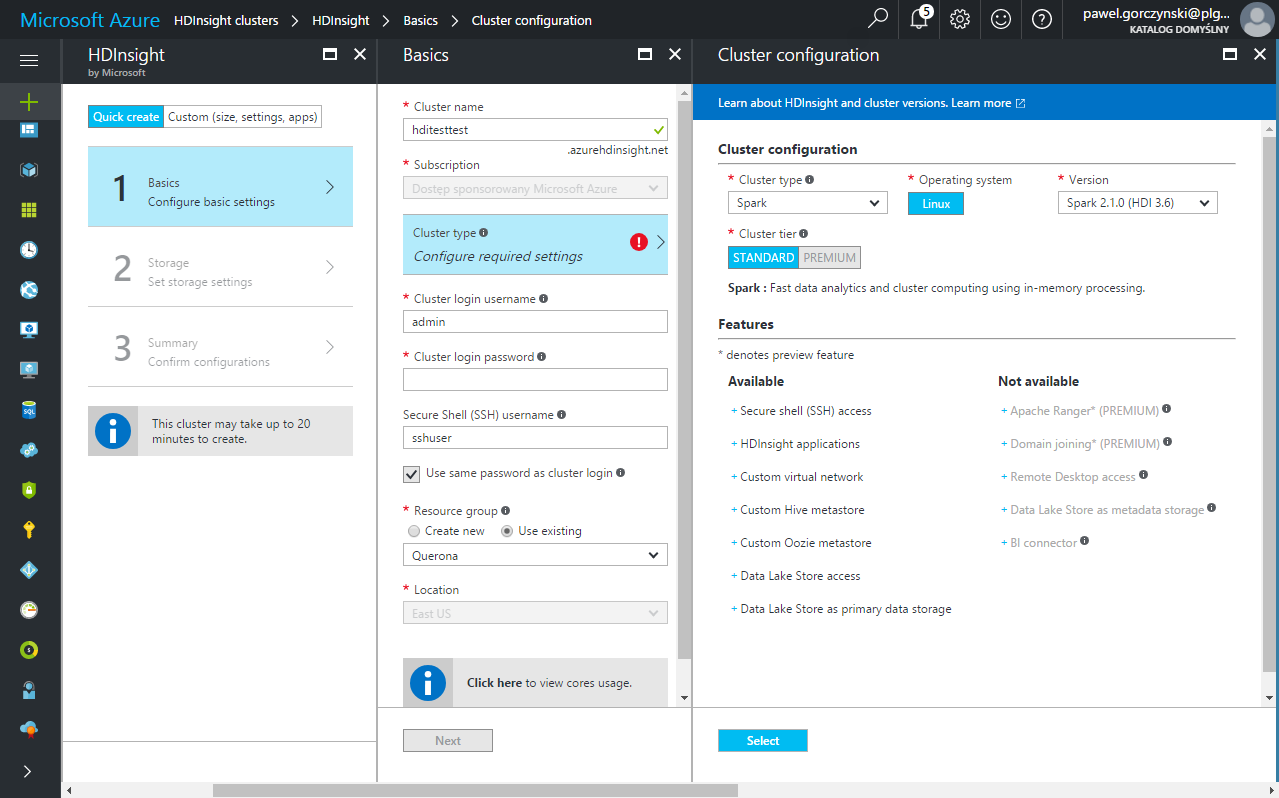
The following table summarizes the important parameters to be defined:
| Parameter | Description |
|---|---|
| Cluster login username | Login that will be used to access Ambari |
| Cluster login password | Password that will be used to access Ambari |
| Secure Shell (SSH) username | See: Troubleshooting |
| Cluster type | Use "Spark" |
| Version | Spark version - Lyftron supports Spark from 1.6.2 upwards |
It is important to note that the communication between HDI and Lyftron is required both ways i.e. Lyftron must be able to reach the driver on the lyftron.driver.port value (default: 8400) and the driver must be able to reach Lyftron on the TDS port (default: 1200). To make it work, the HDI cluster should be placed a proper VLAN meeting these requirements.
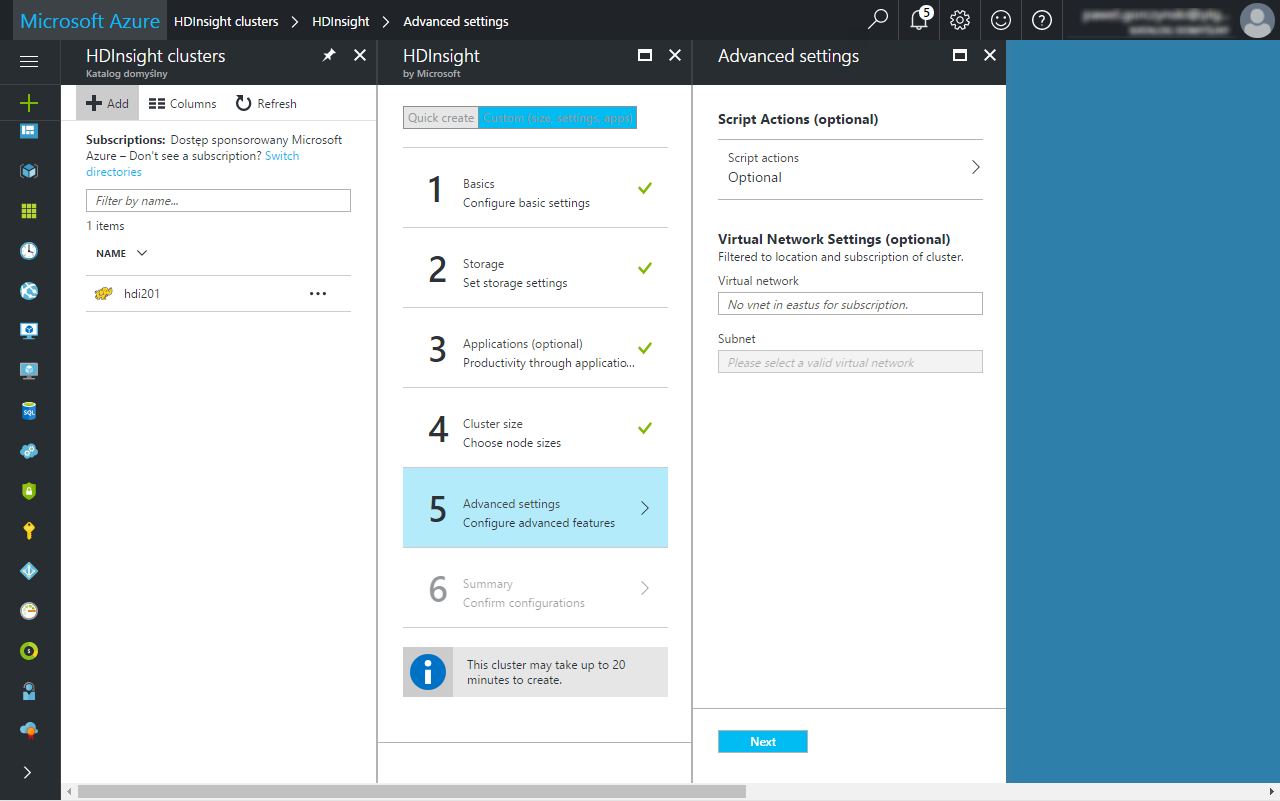
Driver deployment
(further instructions assume that the HDInsight cluster is already configured and running).
The basic idea is similar to Spark Local instance, except the driver is deployed using Azure Portal on all (two) HDInsight head nodes (with failover enabled by default) and submitted with Spark master = master yarn which means that instead of running a new instance we are attaching to the running YARN process.
Building the tarball
Uploading the driver is done using the HDInsight Script Action mechanism. To do this the driver must be packed in a .tar.gz file and uploaded to an arbitrary publicly visible Azure blob.
The necessary tools and folder structure can be found in the %LYFTRON_INSTALL_FOLDER%\HDInsight\version directory. We recommend copying this folder a local-user location to avoid problems with Windows elevated privileges.
The important step to be done at this point it configuring the primary driver parameters. Open lyftron\lyftron-site.xml with any text editor. The following values are particularly important:
| Parameter | Description |
|---|---|
| lyftron.api.key | must match the value entered later when creating a connection to the cluster; shouldn't be left with the default value |
| lyftron.driver.port | The port the driver will listen on (default: 8400) |
| lyftron.driver.protocol | The connection protocol - possible values: thrift, http |
| lyftron.ha.enable | See: Cluster failover |
Additionally a second file log4j.properties contains the Log4J configuration for the Lyftron driver, which can be tweaked as well. By default, it logs all data into ./logs directory separately for each HDInsight head node with TRACE level. Contrary to the local instance, the logs are not streamed back to the master Lyftron instance in any way and thus the only way to access them is logging directly to the given node e.g. by SSH (see: Troubleshooting).
Once done, the Build-Tarball.cmd scripts use 7Zip to the tarball and gzip all necessary files. The following line should be adjusted if necessary: set ZIP_EXE="C:\Program Files\7-Zip\7z.exe"
If everything went fine, a new file like lyftron21.tar.gz should appear. Now this file together with install-lyftron-driver-21.sh must be uploaded to a public Azure blob. You can either do it manually using a tool such as Microsoft Azure Storage Explorer or use the provided Build-Tarball-and-Upload.ps1 which runs the Build-Tarball.cmd and then uses the Azure Powershell to upload both files (installation required).
At this point you either have to use an existing or create a new Azure Storage Account using Azure Portal:
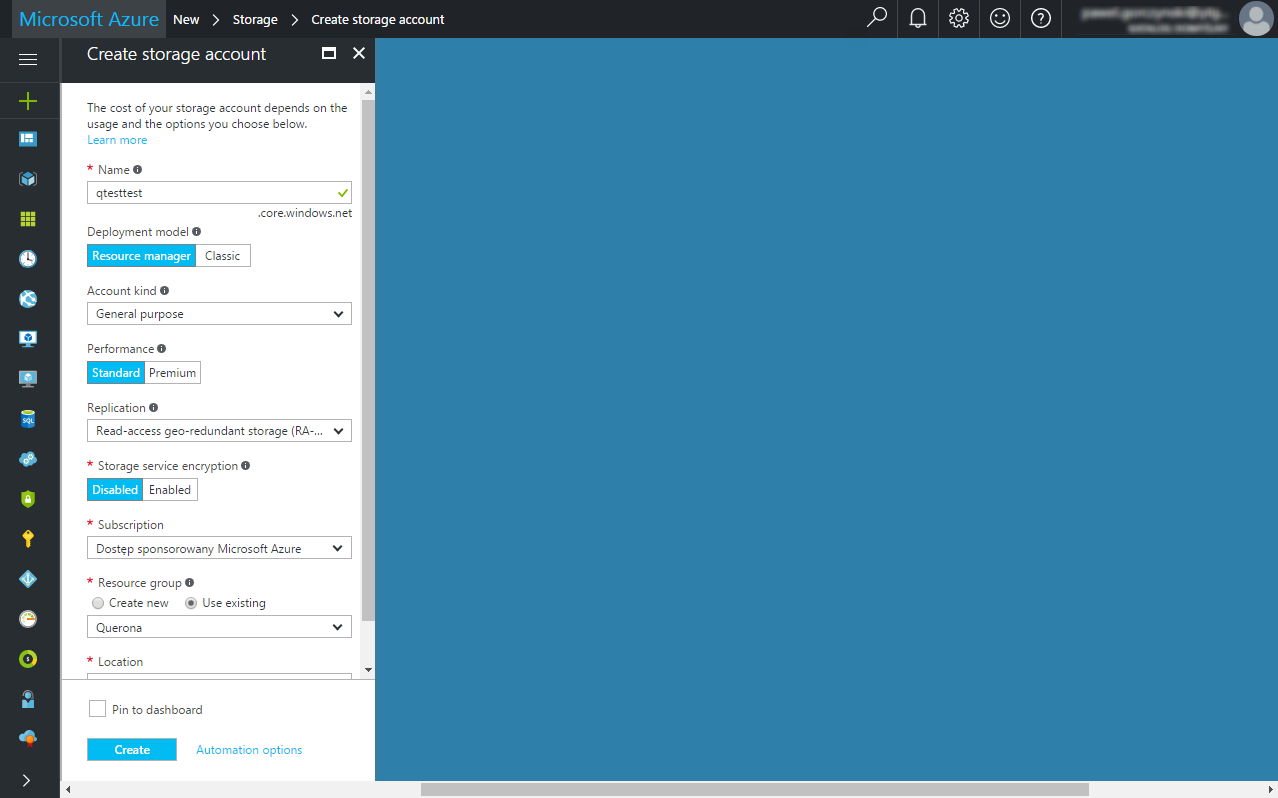
Once created, find the new resource to obtain the StorageAccountName and StorageAccountKey:

Edit the Build-Tarball-and-Upload.ps1 and copy-paste the values to the correct lines of the file. $ContainerName can be changed as well. Once run (using Windows Powershell ISE) a progress bar might appear and after several second the outcome should be more or less like the following:
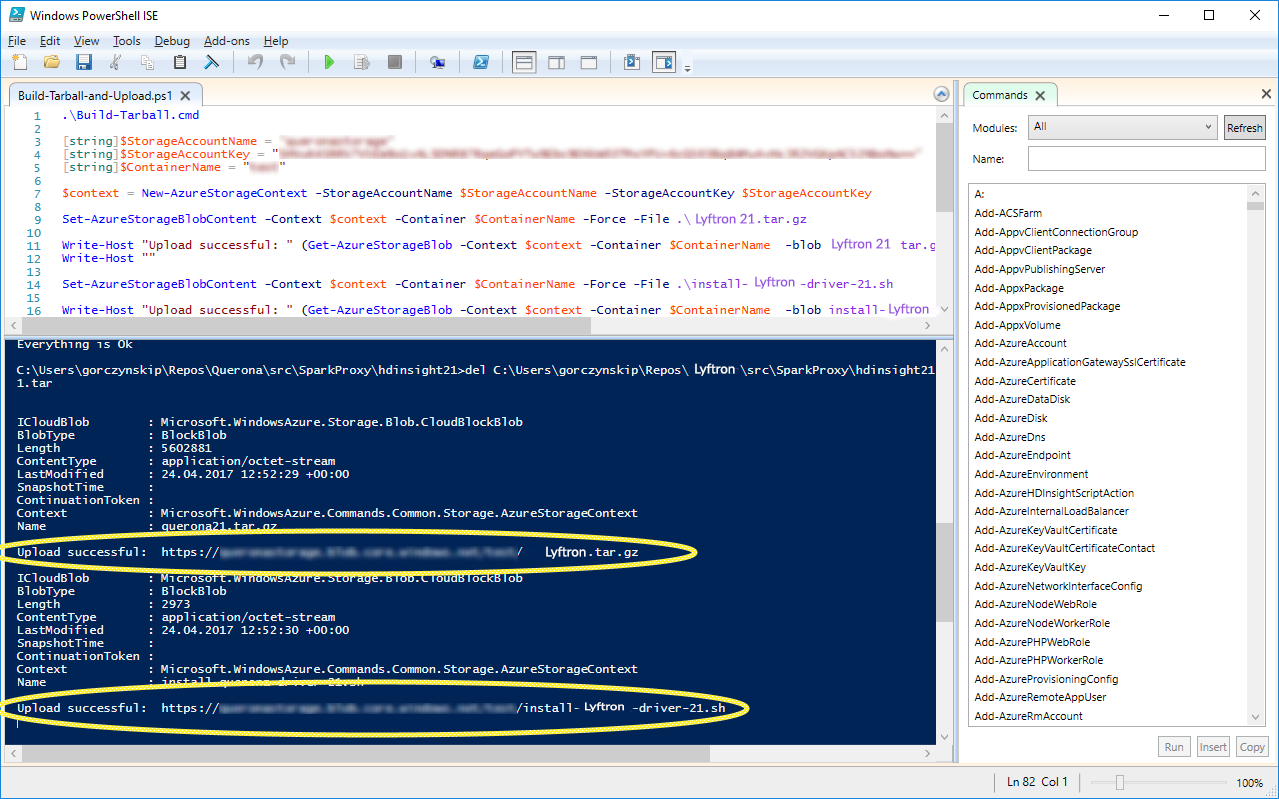
The two highlighted URLs are the final locations of the files. You can copy-paste them in a web browser to make sure they are publicly available (they can be removed after the deployment process).
Running the installation script
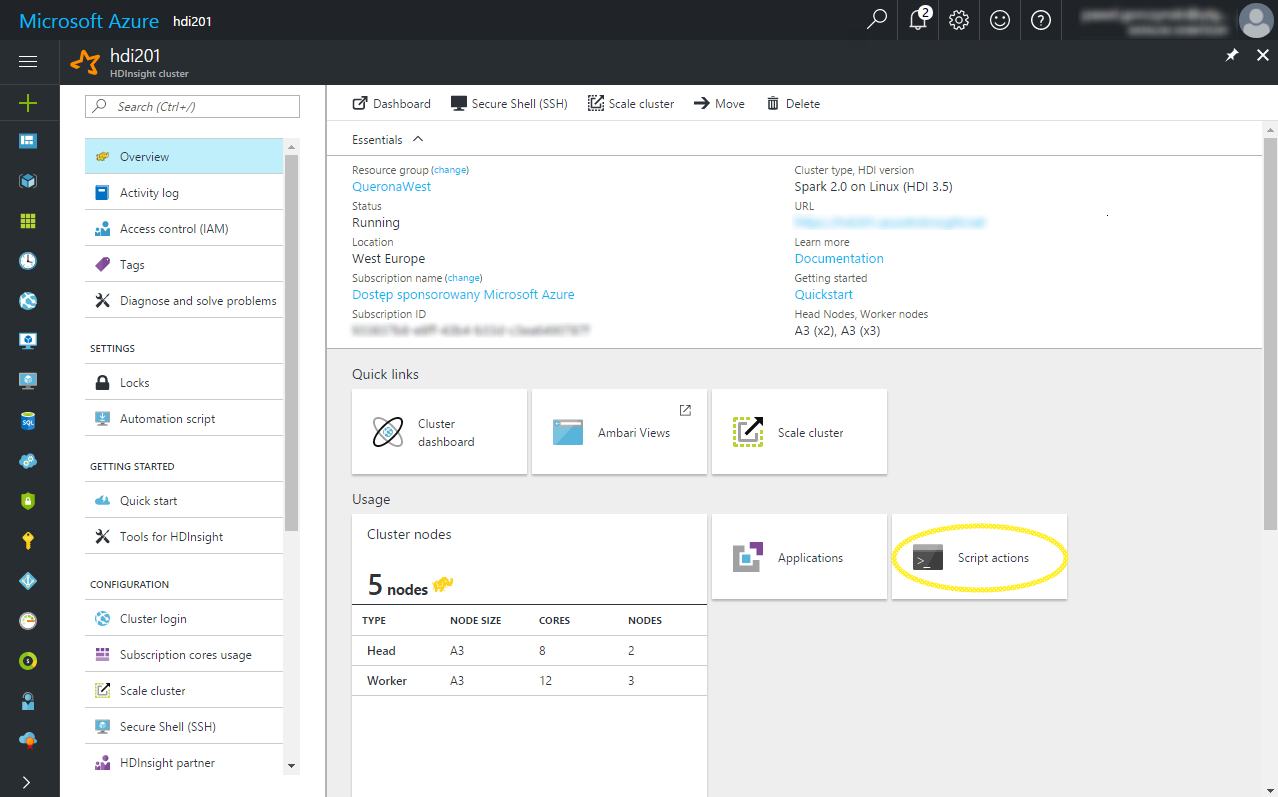
On the HDI cluster management screen please find the Script actions button.
Then click Submit new

You can see the previous submissions as well - the Resubmit option makes it quite convenient to run the same script again in case you need to e.g. change the parameters.
The following table summarizes the inputs
| Parameter | Description |
|---|---|
| Name | A user-friendly name of the script e.g. qdriver202-build-1445 |
| Bash script URI | URL pointing the install-lyftron-driver-21.sh the script generated above e.g. https://test-server.blob.core.windows.net/test/install-lyftron-driver-21.sh |
| Head | Should the script run on head nodes? Check |
| Worker | Should the script run on worker nodes? Uncheck |
| Zookeeper | Should the script run on zookeeper nodes? Uncheck |
| Parameters | Script arguments - see below |
| Persist this script action | This only applies to worker nodes (Uncheck) |
Script arguments should be passed as follows: - the URL of the .tar.gz generated above - spark-submit arguments passed in quotes
So the sample field of this value could be
https://test-server.blob.core.windows.net/test/lyftron21.tar.gz "--driver-memory 4g --executor-memory 4g --executor-cores 1"
Clicking Create should submit the script for execution. Usually, it takes a few minutes for the script to execute. Failures usually occur faster.
Successful execution doesn't always mean everything went fine.. Go through the next chapter to verify.
Using Ambari
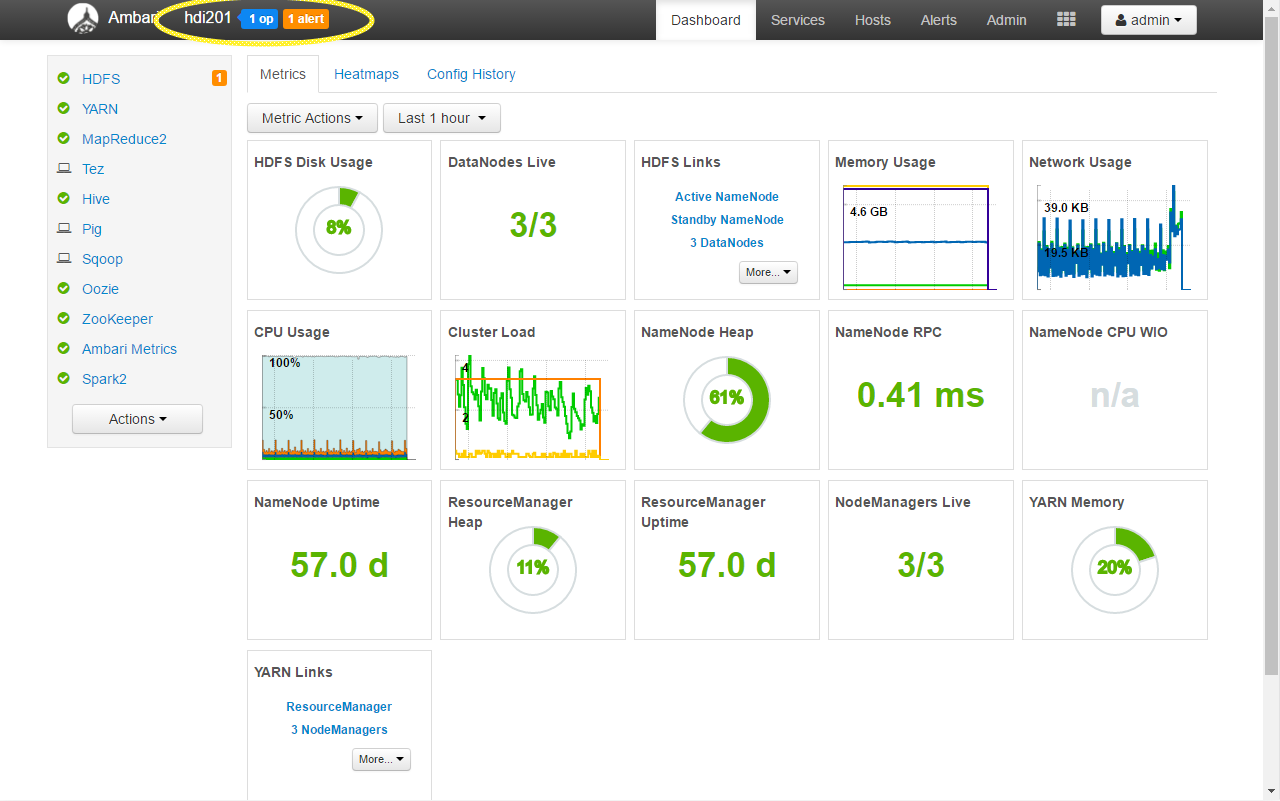
One of the properties on the cluster Dashboard is the URL e.g. https://test-server.azurehdinsight.net. Clicking this URL opens Ambari - a graphical environment used for monitoring the cluster.
Apart from many different functions, you can also monitor the execution of submitted Script actions. They can be accessed during and after execution by clicking in the upper right menu:
This brings up the Background operations window
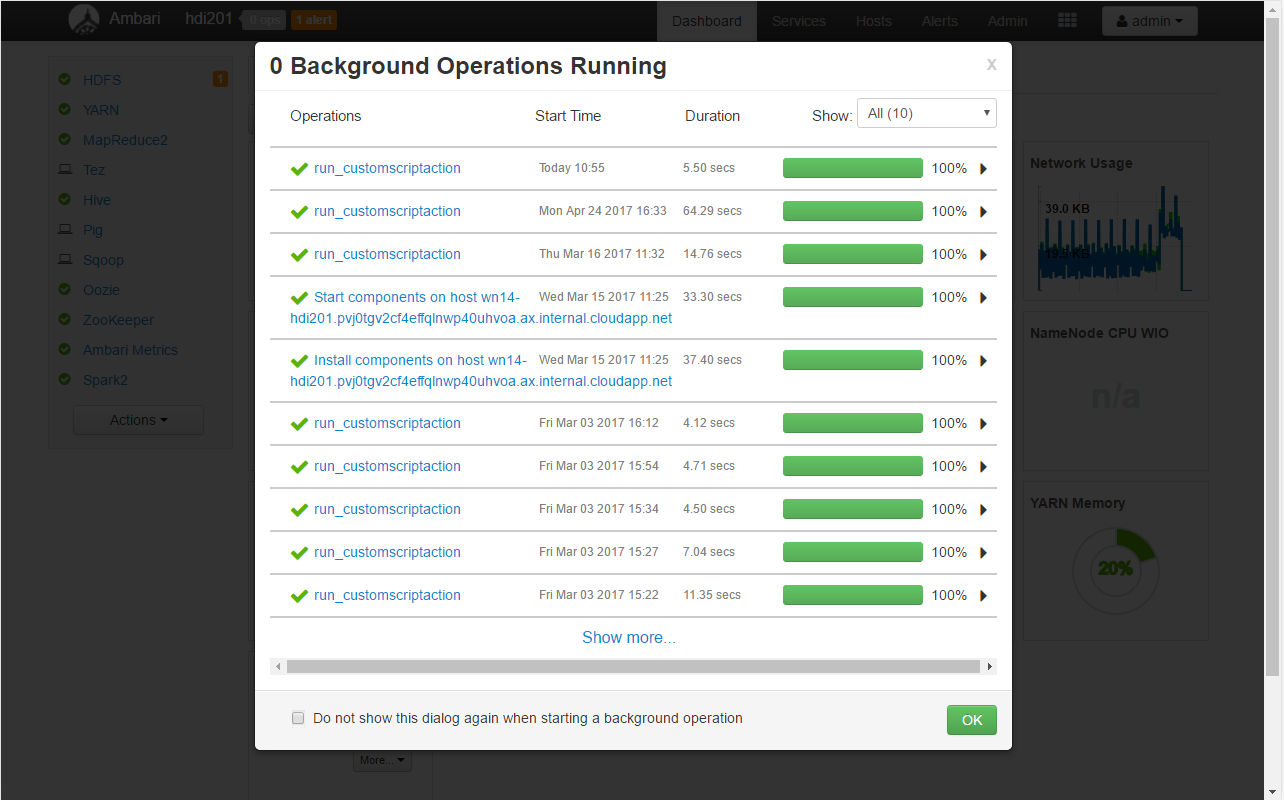
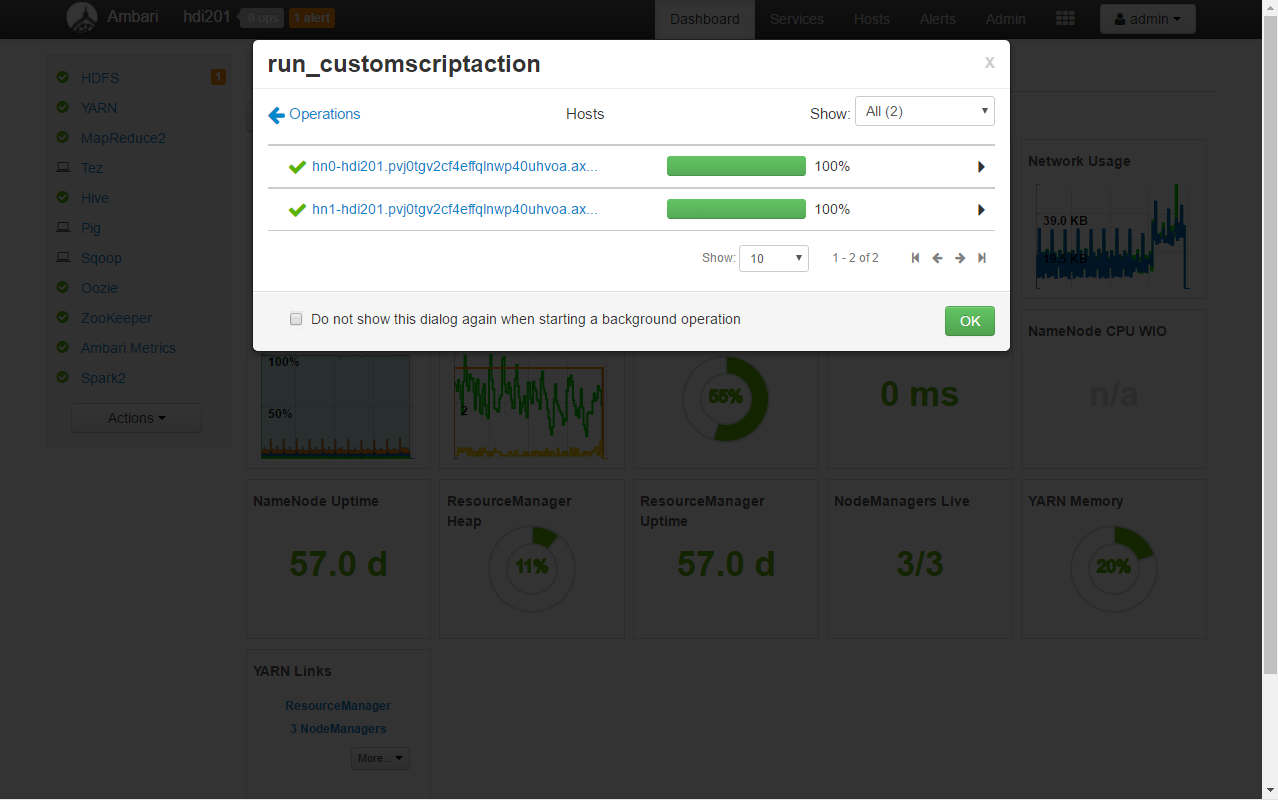
Drilling down will allow to access the execution logs for every requested cluster node (both head nodes in this case):
If everything went fine the logs for every head node should look more or less like the following:
stderr:
--2017-04-25 09:08:37--  https://test-server.blob.core.windows.net/test/lyftron21.tar.gz
Resolving test-server.blob.core.windows.net (test-server.blob.core.windows.net)... 13.79.176.56
Connecting to test-server.blob.core.windows.net (test-server.blob.core.windows.net)|13.79.176.56|:443... connected.
HTTP request sent, awaiting response... 200 OK
Length: 5602881 (5.3M) [application/octet-stream]
Saving to: /tmp/lyftron/lyftron21.tar.gz
0K .......... .......... .......... .......... ..........  0% 1.11M 5s
50K .......... .......... .......... .......... ..........  1%  144M 2s
100K .......... .......... .......... .......... ..........  2% 2.19M 2s
.
.
.
5300K .......... .......... .......... .......... .......... 97%  178M 0s
5350K .......... .......... .......... .......... .......... 98%  110M 0s
5400K .......... .......... .......... .......... .......... 99%  169M 0s
5450K .......... .......... .                               100%  250M=0.3s
2017-04-25 09:08:37 (17.2 MB/s) - /tmp/lyftron/lyftron21.tar.gz saved [5602881/5602881]
stdout:
Starting Lyftron install script on hn0-hdi201.pvj0tgv2cf4effqlnwp40uhvoa.ax.internal.cloudapp.net, OS VERSION: 16.04
Removing Lyftron installation and tmp folder
Downloading Lyftron tar file
Unzipping Lyftron
lyftron/
lyftron/conf/
lyftron/init/
lyftron/init/ojdbc6.jar
lyftron/init/lyftron.conf
lyftron/log4j.properties
lyftron/lyftron-site.xml
lyftron/lyftron.spark.driver-1.0-spark-2.1.0.jar
lyftron/run-driver.sh
Making Lyftron a service and starting
Using systemd configuration
('Start downloading script locally: ', u'https://test-server.blob.core.windows.net/test/install-lyftron-driver-21.sh')
Fromdos line ending conversion successful
Custom script executed successfully
Removing temp location of the script
Command completed successfully!
The last thing we need to note here is the head node IP addresses we will need them in a minute to connect to the driver. These can be found in the Hosts tab in Ambari:

At this point, we can try to add a new Spark connection.
Connecting to HDInsight
For general information see: Connecting to Local Spark
The recommended way to start is to the use the predefined connection template called azure_spark_conn_template
The following table summarizes the differences in connection parameter semantics compared to local instance connection:
| Parameter | Description | Default value |
|---|---|---|
| Host:Port | CSV-list all local head-node IPs here e.g. 10.9.0.17:8400,10.9.0.18:8400 | localhost:8400 |
| Protocol | Must match the one defined in lyftron-site.xml | Thrift |
| Spark dialect | It depends on the used HDI version. 2.0 is recommended for new clusters. | |
| Driver API key | Must match the one defined in lyftron-site.xml | lyftron-key |
| Reverse connection host address | An IP address of Lyftron instance that the driver will use for reverse connections. Must be reachable from both head nodes. | |
| Node connection timeout | The timeout used for waiting for each cluster node to respond. See: Cluster failover | 10s |
| Cluster initialization timeout | Since HDI cluster make take up to a few minutes to boot it's recommended to increase the default value e.g. to 180s | 30s |
Scheduler pools
Same as Local instance
Spark variables
Any properties regarding file system folders shouldn't be set to avoid errors. spark.ui.port is not used - read below.
Hive configuration
Any properties regarding file system folders shouldn't be set to avoid errors.
Connection test and Spark validation
Once configured, the same steps as for local instance can be done to ensure Spark was initialized. But since on HDInsight the driver is deployed a YARN client accessing the Spark GUI in done differently:
Under Ambari click Services -> Yarn -> Quick Links -> any of the nodes -> ResourceManager UI
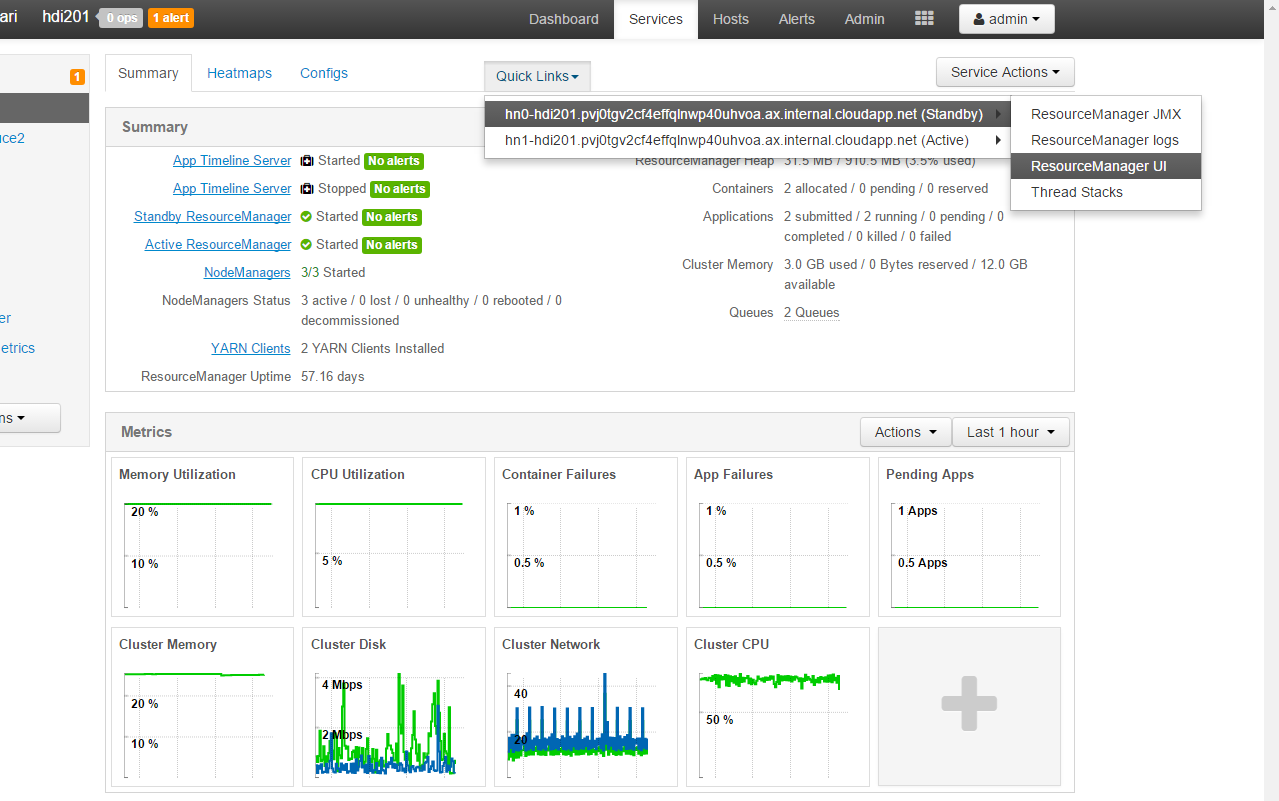
This will open the YARN UI. Since there's only one instance per cluster, it doesn't matter which node you select.
The same UI is also available directly via URL like https://test-server.azurehdinsight.net/yarnui/hn/cluster
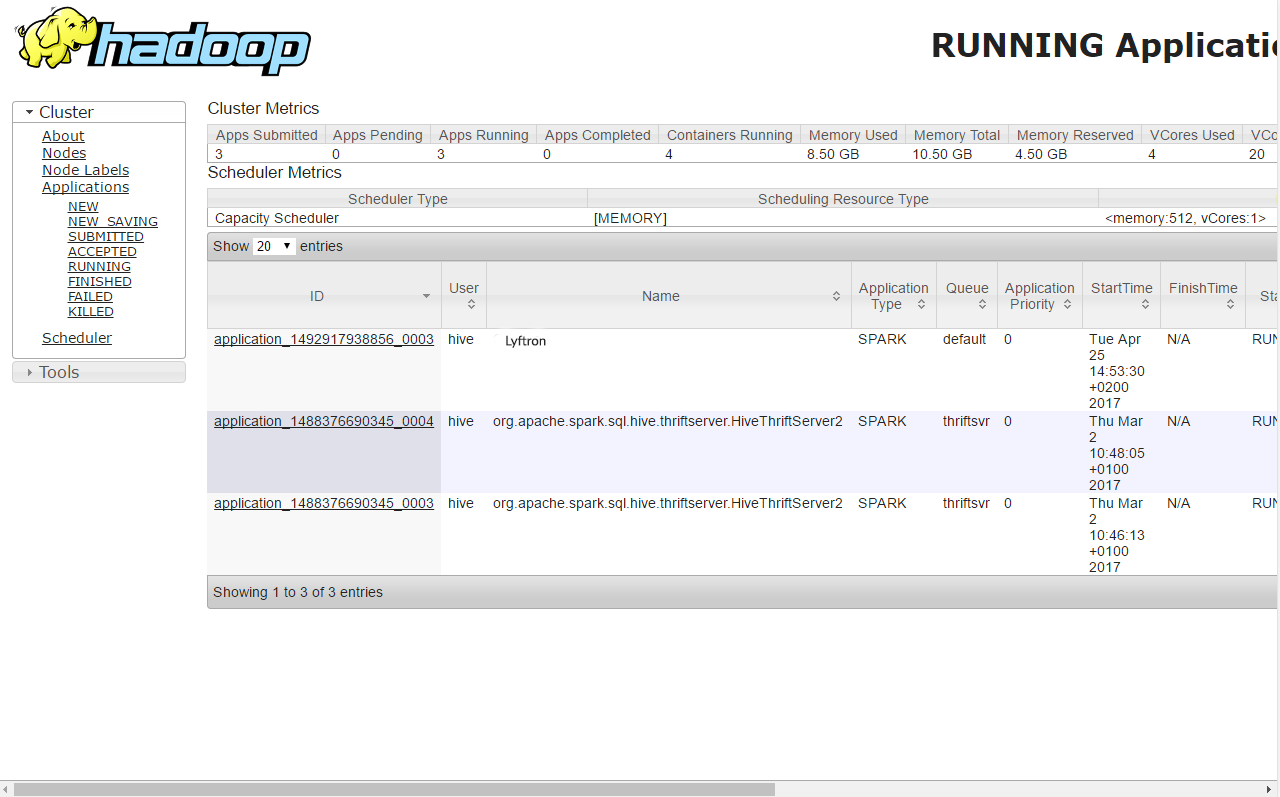
If initialization was trigger our application should first appear on the SUBMITTED list and then move to RUNNING:
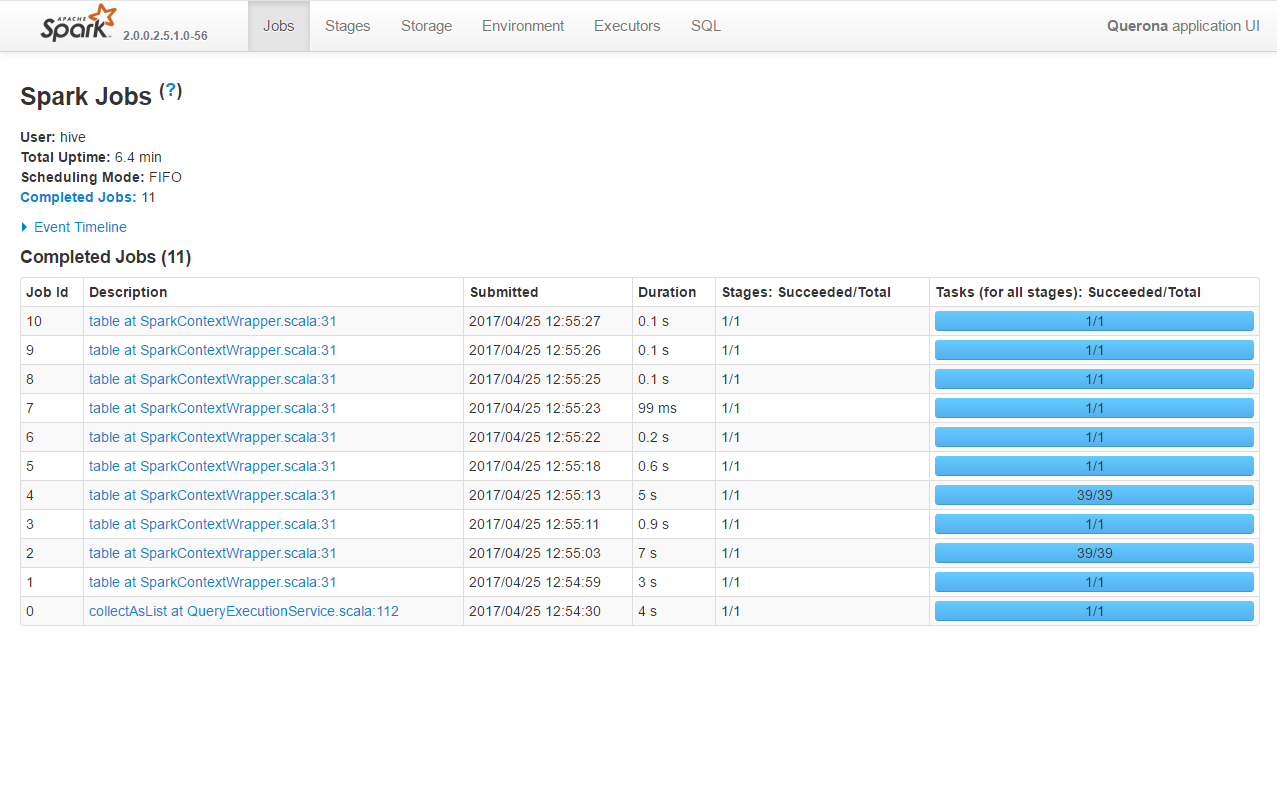
Clicking the ID shows the details screen and from there Tracking URL: ApplicationMaster link leads to the Spark UI:
Advanced management / troubleshooting
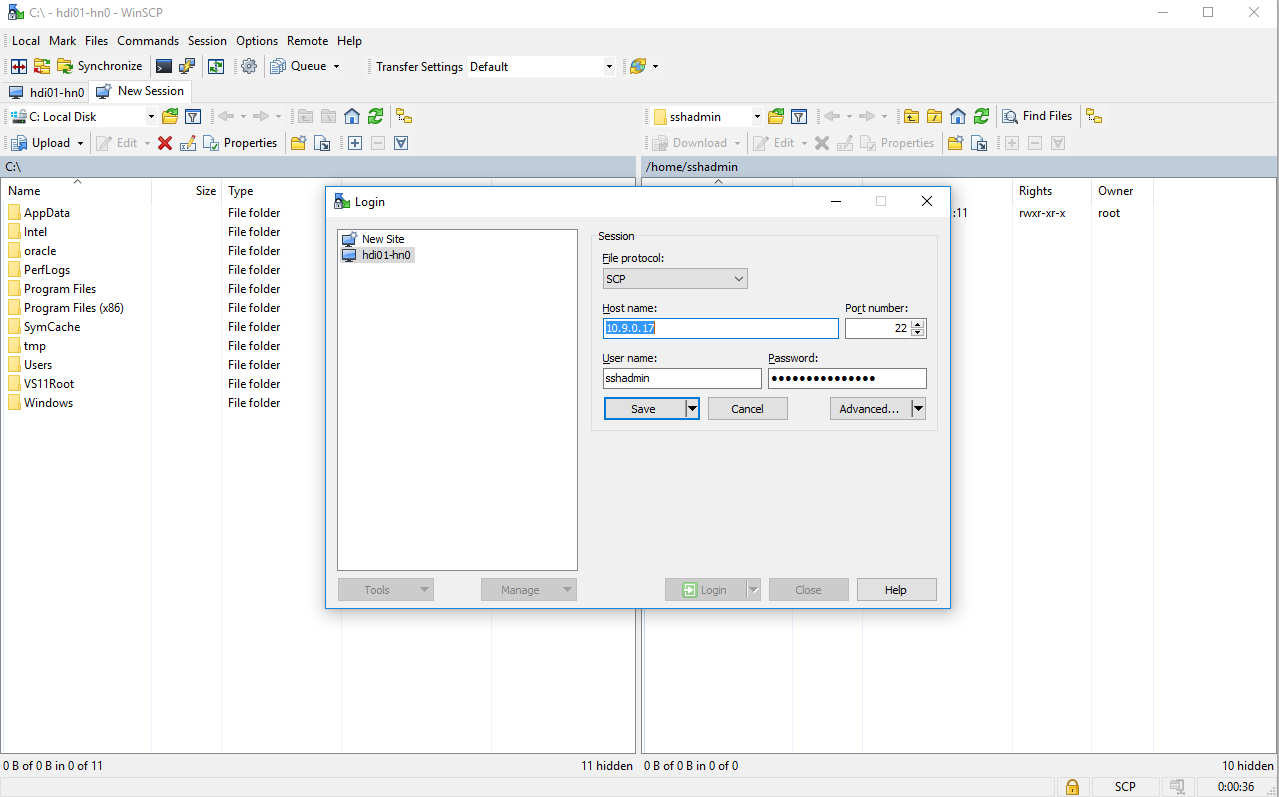
Using WinSCP to view the folder structure
All HDI nodes are Linux-based machines which enable easy management. As an example, we are using WinSCP. The following screenshot shows a sample connection configuration. The Host name field contains the IP address of the first head node.
Navigating to /usr/share/lyftron will take you to the installation folder:
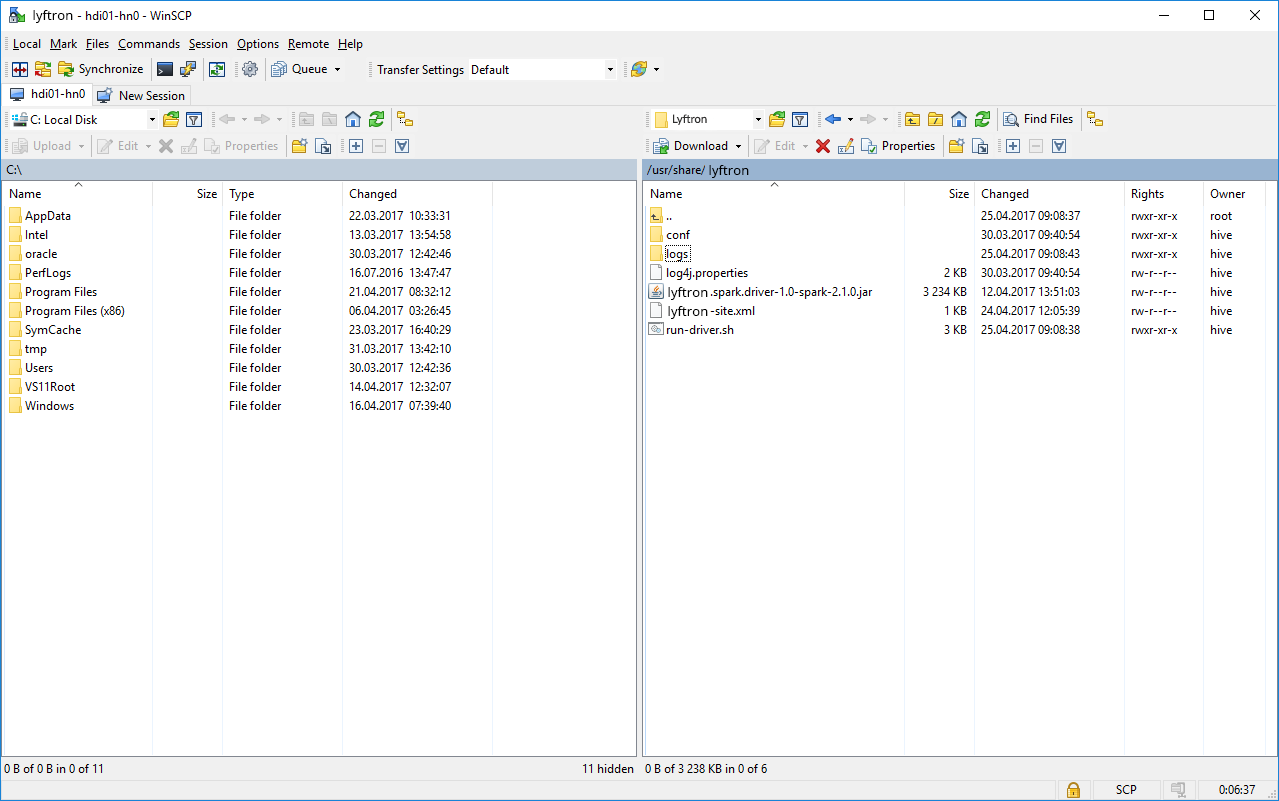
- the logs folder contains the driver log files,
- lyftron-site.xml can be edited here as well, but service restart is required,
- log4j.properties can be used to adjust the logging levels,
Note that we are on a single of two head nodes, so any action must be taken separately for each node. This applies to log files as well.
Using Putty to manage the service
Together with WinSCP, we recommend installing Putty. Then directly from WinSCP we can open a new Putty session and login to the node using CLI.
Starting from HDI 2.0 the driver is run a standard systemd deamon so we can use systemctl to manage the lyftron service.
e.g. running systemctl status lyftron should print something like:
lyftron.service - lyftron service
   Loaded: loaded (/etc/systemd/system/lyftron.service; enabled; vendor preset: enabled)
   Active: active (running) since Tue 2017-04-25 09:08:38 UTC; 3h 19min ago
 Main PID: 37703 (bash)
    Tasks: 20
   Memory: 112.8M
      CPU: 12.974s
   CGroup: /system.slice/lyftron.service
           ??????37703 bash /usr/share/lyftron/run-driver.sh
           ??????37708 /usr/lib/jvm/java-8-openjdk-amd64/bin/java -Dhdp.version=2.5.1.0-56 -cp /usr/hdp/current/hive-server2/lib/sqljdbc41.jar:/usr/share/lyftron

Apr 25 09:08:44 hn0-hdi201 run-driver.sh[37703]:   Starting conductor
Apr 25 09:08:44 hn0-hdi201 run-driver.sh[37703]: 17/04/25 09:08:44 INFO AppConductor: HA is enabled, attempting to start failover service and join leader ele
Apr 25 09:08:44 hn0-hdi201 run-driver.sh[37703]:   17/04/25 09:08:44 INFO AppConductor: Changing NodeState state to: WaitingLeaderResult
Apr 25 09:08:44 hn0-hdi201 run-driver.sh[37703]:   17/04/25 09:08:44 INFO FailoverService: Starting failover monitoring - path: /lyftron-leader-election time
Apr 25 09:08:44 hn0-hdi201 run-driver.sh[37703]:   17/04/25 09:08:44 INFO ActiveStandbyElector: Session connected.
Apr 25 09:08:44 hn0-hdi201 run-driver.sh[37703]:   17/04/25 09:08:44 INFO ActiveStandbyElector: Successfully created /lyftron-leader-election in ZK.
Apr 25 09:08:44 hn0-hdi201 run-driver.sh[37703]:   17/04/25 09:08:44 INFO FailoverService: Joining election, my data: 10.9.0.17:8400
Apr 25 09:08:44 hn0-hdi201 run-driver.sh[37703]:   17/04/25 09:08:44 INFO LyftronServer: starting thrift server on port 8400
Apr 25 09:08:44 hn0-hdi201 run-driver.sh[37703]:   17/04/25 09:08:44 INFO AppConductor: Releasing Spark
Apr 25 09:08:44 hn0-hdi201 run-driver.sh[37703]:   17/04/25 09:08:44 INFO AppConductor: Changing NodeState state to: Standby
sudo systemctl restart lyftron can be used in case of serious problems.
Cluster failover
Lyftron driver supports automatic failover using Apache Zookeeper.
To make it work the driver has to have at least two instances running and the Zookeeper service must be available. There are two parameters in the lyftron-site.xml regarding this:
| Parameter | Description |
|---|---|
| lyftron.ha.enable | Enables/disables failover. Enabled by default in the HDInsight, disabled for local instances. Possible values: true, false |
| ha.zookeeper.quorum | A CSV-list of a server:port values of Zookeeper servers. In HDInsight the value is already provided by the environment and is not required. |
Once started, all driver instances will participate in a leader election and choose the active node. All other nodes will continue to listen for incoming connection but will transition to StandBy state.
Now when adding a new Spark connection, all servers should be entered in the Host:Port configuration field. Lyftron will try to find the active node using round-robin. Node connection timeout determines the wait time per each node. If an active node is not found within the Cluster initialization timeout the connection will fail.
If for any reason one of the nodes fails, a new election will start automatically and the new active node is chosen. Any queries that were halted by the node failure, will be rerun automatically once a new active node is found.